Thursday, December 26, 2019
Wednesday, December 25, 2019
Delete large folders in Windows super fast
How to delete large folders in Windows super fast
When you delete huge folders in Windows, you will notice that the process takes quite a bit of time to complete.
I keep backup folders of Ghacks locally on a platter-based drive, and these folders come close to 30 Gigabytes in size with more than 140,000 files and 350 folders.
When I need to delete them again, it takes a long time if I run the delete operation in Windows Explorer. First thing that happens is that Windows runs calculations which in itself may take a very long time to complete.
Then when the actual deleting takes place, Windows analyzes the process and posts updates to the file operation window.
It may take ten or twenty minutes, or even longer, to delete a large folder using Explorer on Windows devices.
How to delete large folders in Windows super fast
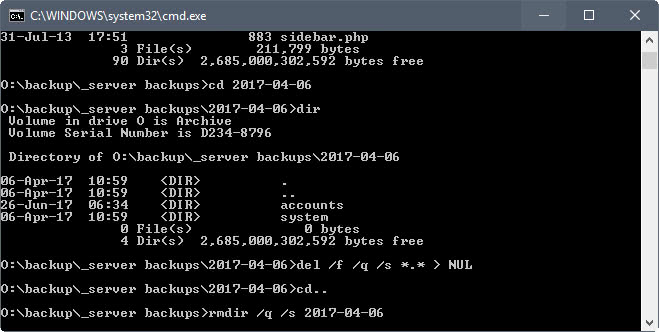
If you run delete commands from the command line instead, you will notice that the operation completes a lot faster. You may notice that the operation needs just a fraction of time that the same operation requires when you run it in Explorer.
Matt Pilz, who wrote about this back in 2015 saw a reduction from 11 minutes to 29 seconds, which made the command line operation more than 20 times faster than the Explorer option.
The downside to this is that it requires use of the command line. Matt suggested to add the commands to the Explorer context menu, so that users could run them in Explorer directly.
The two commands that users require are Del, for deleting files, and Rmdir, for removing directories.
- Tap on the Windows-key, type cmd.exe and select the result to load the command prompt.
- Navigate to the folder that you want to delete (with all its files and subfolders). Use cd path, e.g. cd o:\backups\test\ to do so.
- The command DEL /F/Q/S *.* > NUL deletes all files in that folder structure, and omits the output which improves the process further.
- Use cd.. to navigate to the parent folder afterwards.
- Run the command RMDIR /Q/S foldername to delete the folder and all of its subfolders.
The commands may require some explanation.
DEL /F/Q/S *.* > NUL
- /F -- forces the deletion of read-only files.
- /Q -- enables quiet mode. You are not ask if it is ok to delete files (if you don't use this, you are asked for any file in the folder).
- /S -- runs the command on all files in any folder under the selected structure.
- *.* -- delete all files.
- > NUL -- disables console output. This improves the process further, shaving off about one quarter of the processing time off of the console command.
RMDIR /Q/S foldername
- /Q -- Quiet mode, won't prompt for confirmation to delete folders.
- /S -- Run the operation on all folders of the selected path.
- foldername -- The absolute path or relative folder name, e.g. o:/backup/test1 or test1
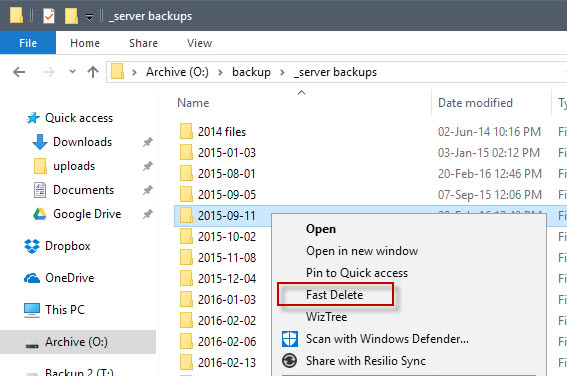
Creating a batch file and adding it to the Explorer context menu
If you don't need to run the command often, you may be perfectly fine running the commands directly from the command prompt.
If you do use it frequently however, you may prefer to optimize the process. You may add the command to the Explorer context menu, so that you can run it from there directly.
First thing you need to do is create a batch file. Create a new plain text document on Windows, and paste the following lines of code into it.
@ECHO OFF
ECHO Delete Folder: %CD%?
PAUSE
SET FOLDER=%CD%
CD /
DEL /F/Q/S "%FOLDER%" > NUL
RMDIR /Q/S "%FOLDER%"
EXIT
ECHO Delete Folder: %CD%?
PAUSE
SET FOLDER=%CD%
CD /
DEL /F/Q/S "%FOLDER%" > NUL
RMDIR /Q/S "%FOLDER%"
EXIT
Save the file as delete.bat afterwards. Make sure it has the .bat extension, and not the .txt extension.
The batch file comes with a security prompt. This provides you with options to stop the process, important if you have selected the context menu item by accident. You can use CTRL-C or click on the x of the window to stop the process. If you press any other key, all folders and files will be deleted without any option to stop the process.
You need to add the batch file to a location that is a PATH environmental variable. While you may create your own variable, you may also move it to a folder that is already supported, e.g. C:\Windows.
Do the following to add the new batch file to delete folders quickly to the Windows Explorer context menu.
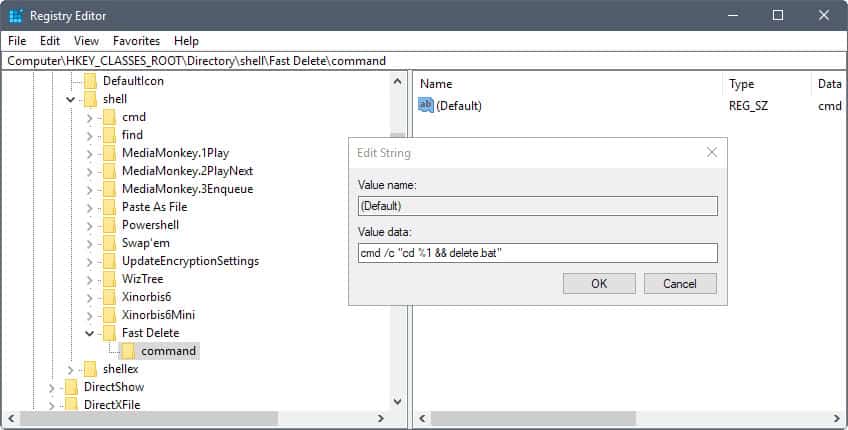
- Tap on the Windows-key, type regedit.exe and tap in the Enter-key to open the Windows Registry Editor.
- Confirm the UAC prompt.
- Go to HKEY_CLASSES_ROOT\Directory\shell\
- Right-click on Shell and select New > Key.
- Name the key Fast Delete
- Right-click on Fast Delete, and select New > Key.
- Name the key command.
- Double-click on default of the command key.
- Add cmd /c "cd %1 && delete.bat" as the value.
Tuesday, December 24, 2019
Sunday, December 22, 2019
How can we paste the code into the HTML of your page, between the head and head tags
https://www.google.com/adsense/new/u/0/pub-5304237173007760/myads/sites
Google AdSense Earnings At Risk Warning - Create Ads.txt File
How can we paste the code into the HTML of your page, between the <head> and </head> tags for connecting your site to Google AdSense?
or first time you are trying to monitise your site google will provide you a code saying paste it to head section so that adscence will spread the spider to your site and monitise your site.
For Blogger:-
Go to blogger then >go to left corner >go to themes>go to edit html >Now paste that code in between head section(Keep in mind this work only when you’re with your p.c)
For WordPress:-
In case if you are using WordPress theme then you can find it in the header.php file which is situated in Appearance > Editor > header.Php file
Saturday, December 21, 2019
Change Your WordPress Database Name in 3 Simple Steps
Change Your WordPress Database Name in 3 Simple Steps
Your WordPress database holds all of your site’s important information, so keeping it safe and organized isn’t something that should be neglected.
Naming your database in a descriptive way can help you more easily keep track of your site and help prevent you from making unintended changes when you can’t tell your databases apart. It also helps protect your site by making it more difficult for hackers to identify and access your database details.
It’s easy to change your database from a default name like db_wordpress123 to db_mysite and it can be done in about five minutes. In this Weekend WordPress Project, I’ll show you how to change the end of your database name to something more recognizable to you, while also being less guessable for hackers.
Edit Your Database
Head over to phpMyAdmin. In cPanel, you can access it through the Databases section of the home page. Once there, select your database from the menu on the left, then click the Operations tab at the top.

Under Rename database to, enter the name you would like to see for your database in the text field and click Go on the bottom, right corner of field. You will be prompted with a pop-up to accept the change.
You will be creating a new database with your chosen name, dropping the tables in your original, then importing those tables to your new database. Click OK to continue with these changes.
Edit Your wp-config.php File
Navigate to your site’s files and in the root of your WordPress install, locate your wp-config.php file. In cPanel, edit the file by selecting it from the list and clicking the Edit button at the top of the page. If a pop-up appears, click Edit again.
You can also choose to download the file through FTP and edit it with a text editor. Either way, include your new database name by finding the piece of code similar to the one below:
https://gist.github.com/jennimckinnon/61816227d6525a28c8a1
Find
define('DB_NAME', 'your_db'); in your file, where your_db is the original name of your database and change it to the new name you chose a moment ago.
Save the file and if you’re using FTP, upload the new file to the root of your install.
Assign a Database User
In cPanel, click on MySQL Databases under the Databases section. Scroll down to the Add a User to a Database area and select your username from the User drop down box.
If you’re not sure what it is, it’s listed in your wp-config.php file on the line with
DB_USER just like in the example above.
Next, select your new database name from the Database drop down box and finally, click the Add button. On the page that loads, select the All Privileges checkbox toward the top, then click the Make Changes button below the table.

Reactivate all your plugins and you’re done!
How to Remove Products in Bulk from Woocommerce
Step 1: Login to phpmyadmin from your Cpanel Hosting
Login to your cPanel hosting or Plesk hosting, Scroll down to database section and click on phpmyadmin.
Step 2: Select the Database
Click on the Respective database and click on SQL tab at top as shown in the below picture.

Step 3: COPY AND PASTE the below code
DELETE relations.*, taxes.*, terms.*
FROM wp_term_relationships AS relations
INNER JOIN wp_term_taxonomy AS taxes
ON relations.term_taxonomy_id=taxes.term_taxonomy_id
INNER JOIN wp_terms AS terms
ON taxes.term_id=terms.term_id
WHERE object_id IN (SELECT ID FROM wp_posts WHERE post_type='product');

DELETE FROM wp_postmeta WHERE post_id IN (SELECT ID FROM wp_posts WHERE post_type = 'product');
DELETE FROM wp_posts WHERE post_type = 'product';
Step 4: Click on Go Button and wait a few minutes.
Once the query is executed properly, All the products are removed. Go and check in WordPress Admin. All the products are removed.
Thursday, December 19, 2019
Wednesday, December 18, 2019
How and where fo buy academic project paper
https://www.google.com/search?sxsrf=ACYBGNSRbfzmscTpIMXTNJBbqAniKQn8cQ%3A1576731799475&ei=lwT7Xa_NHKXBz7sP6M6PoAU&q=how+to+buy+academic+project+paper&oq=how+to+buy+academic+project+paper&gs_l=psy-ab.3..33i22i29i30.549566.584921..586072...5.2..1.548.13122.0j2j43j4j0j1......0....1..gws-wiz.......0i71j0i273j0i67j0j0i131j35i39j0i20i263j0i10j0i22i10i30j0i22i30j33i160.u_6Cx4ophCI&ved=0ahUKEwjv9MDW98DmAhWl4HMBHWjnA1QQ4dUDCAs&uact=5
https://www.customwritings.com/our-essay-samples.html
https://www.customwritings.com/our-essay-samples.html
Rilis WP Affiliasi versi 3.3
https://cafebisnis.com/info/448-rilis-wp-affiliasi-versi-33
Selamat Datang Ayob Hussin
Hallo Ayob Hussin, bagaimana kabar hari ini? Berikut statistik anda:
URL Affiliasi
Halaman home Cafebisnis: https://cafebisnis.com/?reg=nam5679
WP Affiliasi Multilevel: https://cafebisnis.com/produk/wp-affiliasi?reg=nam5679
Cafebisnis Autoresponder: https://cafebisnis.com/produk/cbauto?reg=nam5679
Premium Member CB: https://cafebisnis.com/produk/premium?reg=nam5679
WP Iklan Baris: https://cafebisnis.com/produk/iklanbaris?reg=nam5679
WP Affiliasi Multilevel: https://cafebisnis.com/produk/wp-affiliasi?reg=nam5679
Cafebisnis Autoresponder: https://cafebisnis.com/produk/cbauto?reg=nam5679
Premium Member CB: https://cafebisnis.com/produk/premium?reg=nam5679
WP Iklan Baris: https://cafebisnis.com/produk/iklanbaris?reg=nam5679
Tuesday, December 17, 2019

Sunday, December 15, 2019
Saturday, December 14, 2019
Post Auto Share
This plugin enables you to share the relevant posts, contents of your website and WooCommerce developed products onto your social media pages along with images and custom content (enabling SMO- Social Media Optimization).
https://www.gpltimes.com/product/post-auto-share/
https://www.gpltimes.com/product/post-auto-share/
MailChimper PRO
MailChimper PRO is a WordPress MailChimp Form Plugin, that support MailChimp along with many more other providers. Gives you the ability to collect the visitors email address with this fancy, attention grabber newsletter subscription form, then directly pass the data to your MailChimp list. The signup forms are easily and fully customizable and you can translate all texts on it. By default, you will get a ready subscription form, just you have to fill out with your email address or MailChimp ID.
https://www.gplfamily.com/item/mailchimper-pro-wordpress-mailchimp-signup-form/
https://www.gpltimes.com/product/mailchimper-pro-wordpress-mailchimp-signup-form-plugin/
https://codecanyon.net/item/mailchimper-pro-wordpress-mailchimp-signup-form-plugin/7644126
Mailster is an all-in-one email marketing plugin for Wordpress which has every feature that can be required by any user. Some of the key features are drag and drop facility, storage option, auto-responder system, analytics integration and mobile friendly design. Mailster is fully compatible with most of the famous services like sendgrid, mandrill, kickbox, formcraft, google analytics, memberpress, mailgun, etc.
https://www.gpltimes.com/product/mailster-email-newsletter-plugin/
best plugin and Multi Level Marketing MLM Business

Multi Level Marketing/ MLM Business
egMLM is a only software that you need to build, manage, control and organize your Multi Level Marketing/ MLM Business.
egMLM allow you to configure custom pay plans and compensation rule such as Binary plan, Pairing bonus, Matching bonus, Unilevel matrix, Revolving matrix, Regular matrix, Pool bonus, Reward bonus, Pass-up bonus, Sponsor bonus, Reward point, etc.
egMLM is also includes necessary features like Multi Membership/ Enrollment packages, E-wallet, managing distributors & downline members, Ranks, handling MLM leads, processing commissions & payouts, track sales volumes, statistics, ePIN, eCopupon, ecommerce/Online Shop/ Shopping cart and many more... All these features included in the product that you can get with cheap price!
Friday, December 13, 2019
Wednesday, December 11, 2019
Tuesday, December 10, 2019
NET Framework fails to install
[SOLVED] Windows 10 – .NET Framework fails to install
Problem
Windows 10 prompts that the .NET Framework needs to be installed.
An app on your PC needs the following Windows feature:
.NET Framework 3.5 (includes .NET 2.0 and 3.0)

But when you attempt the install using the ‘Download and install this feature’ the install fails.
This following feature couldn't be installed:
.NET Framework 3.5 (includes .NET 2.0 and 3.0)

Solution
To fix this problem you will need to install the .NET Framework offline, from your Windows 10 install media.
To be able to do this you will first need a Windows 10 install USB. If you do not already have this see Windows 10 – How to create a install USB.
- In the Windows search box, type cmd
- When ‘Command Prompt’ appears, right-click on it and select ‘Run as administrator’

- In the command prompt enter the following command – changing D to the current drive letter for your Windows install USB
Dism /online /enable-feature /featurename:NetFX3 /All /Source:D:\sources\sxs /LimitAccess

- The install will take a few minutes to complete.
- Once it reads ‘The operation completed successfully.’ you can close the command prompt window.
***********************
Thankfully, this issue is entirely fixable, and there are a couple of ways you can resolve this issue and successfully install .NET Framework 3.5 on a Windows 10 computer. First and foremost, before resorting to any drastic measures, you can repair your computer’s component store and then try installing .NET Framework 3.5 all over again. To repair your computer’s component store, you need to:
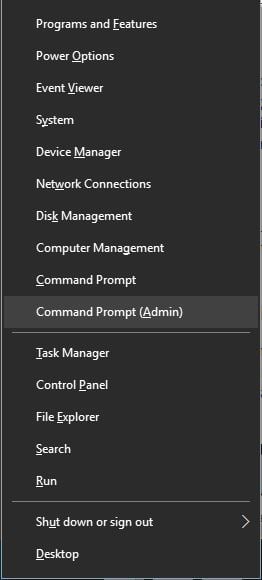
Right-click on the Start Menu button to open the WinX Menu
Click on Command Prompt (Admin) in the WinX Menu.
Type the following into the elevated Command Prompt and press Enter:
Dism /Online /Cleanup-Image /StartComponentCleanup
Once the previous command has been successfully executed, type the following into the elevated Command Prompt and then press Enter:
Dism /Online /Cleanup-Image /RestoreHealth
PRO TIP: If the issue is with your computer or a laptop/notebook you should try using Reimage Plus which can scan the repositories and replace corrupt and missing files. This works in most cases, where the issue is originated due to a system corruption. You can download Reimage by Clicking Here
As soon as both commands have been executed, close the elevated Command Prompt.
Try installing .NET Framework once more and see whether or not the issue still persists.
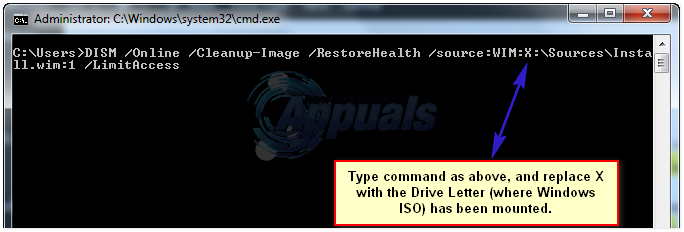
If repairing your computer’s component store doesn’t do the trick, don’t worry as you can still fix this problem – you can do so by installing .NET Framework 3.5 on your computer through a Windows 10 installation media. In order to do so, you are going to have to:
Insert a Windows 10 installation media into your computer or mount a Windows 10 ISO onto a virtual drive in your computer. Make sure that the Windows 10 installation media or ISO you use matches the version of Windows 10 that you have on your computer, meaning that if your computer is running on a 32-bit version of Windows 10, be sure to use an installation media or ISO of the same kind.
Launch an elevated Command Prompt by right-clicking on the Start Menu to open the WinX Menu and then clicking on Command Prompt (Admin).
Type the following command into the elevated Command Prompt, replacing the X in the command-line with the drive letter assigned to the drive on your computer that is housing the Windows 10 installation media or ISO that you want to use to fix this problem:
dism /online /enable-feature /featurename:NetFx3 /Source:X:\sources\sxs /all /LimitAccess
Today in this article, we are going to share the solution given by our reader Patrik so that all Windows 8 and later users can install .NET Framework 3.5 without any problem.
This solution should work for all devices whether its a Desktop PC, laptop or Surface tablet running on Windows 8, Windows 8.1 or Windows 10 operating systems.
If you are also facing problems while installing .NET Framework 3.5 in Windows 8 or later, check out following method to fix the issue:
1. Type gpedit.msc in RUN or Start search box and press Enter. It'll open Group Policy Editor.
2. Now go to:
Computer Configuration -> Administrative Templates -> System
3. In right-side pane, look for "Specify settings for optional component installation and component repair" option.

4. The option would be set to Not Configured. Double-click on it, set it to Enabled and enable "Contact Windows Update directly to download repair content instead of Windows Server Update Services (WSUS)" option.

That's it. Now try to install .NET Framework 3.5 again using Control Panel -> Programs and Features or by using DISM command and now you'll not face any problem
****************************
System File Checker (SFC) is a utility in Microsoft Windows that allows users to scan for and restore corruptions in Windows system files. This utility is available on all versions of Windows OS and is located in C:WindowsSystem32 folder.
This article will describe the following issues related to SFC tool:
- How to run the system file checker tool
- How to use SFC scannow in Safe Mode
- How to fix most common SFC errors
The time required for SFC command scannow to repair important windows files is usually from 5 to 15 minutes.
How to run SFC scannow in Windows 10
The SFC might resolve many system errors, including blue screen issues. This is how you can run an SFC scan in Windows.
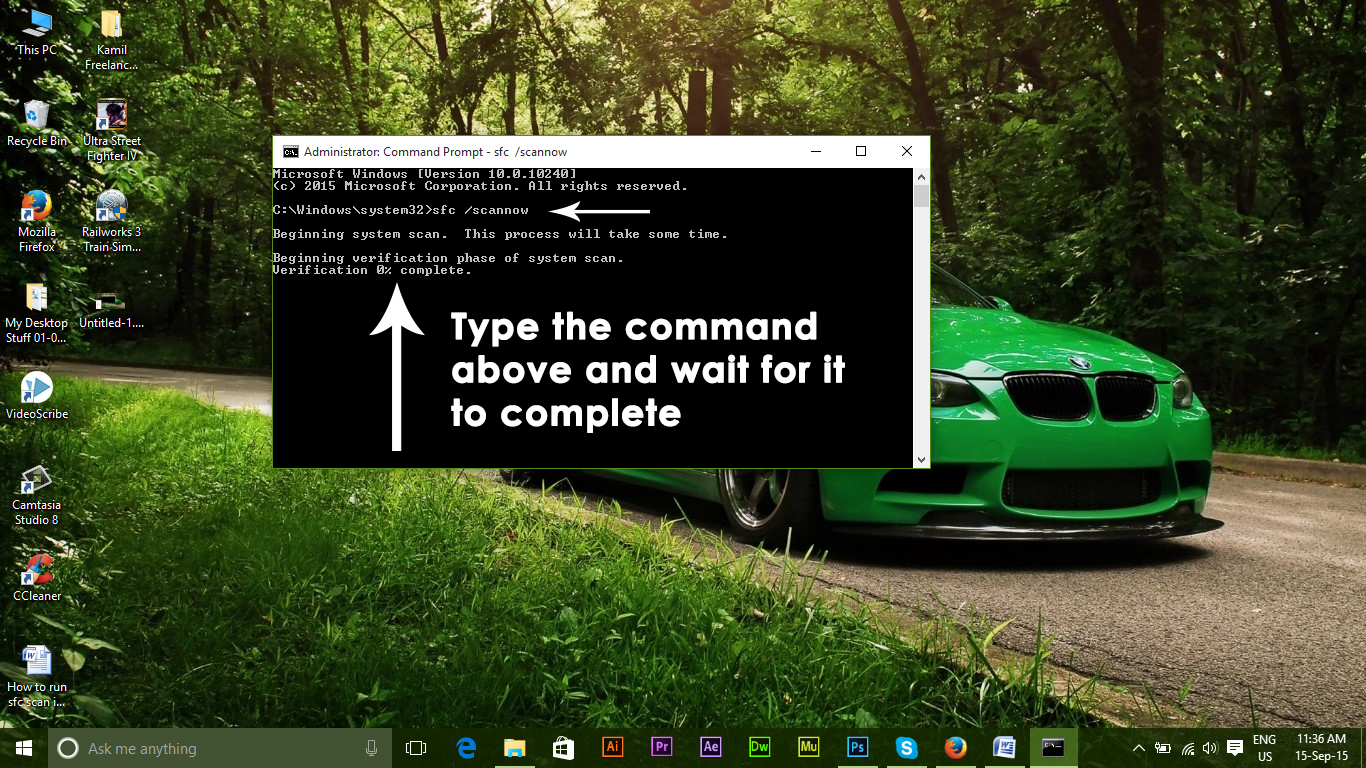
- Press the Windows key + X to open the main menu.
- Click Command Prompt (Admin) to open the Command Prompt as an administrator.
- When Command Prompt opens, enter sfc /scannow and press Enter.
- The repair process will now start. Don’t close Command Prompt or interrupt the repair process. The repair process can take a while, so wait patiently while it completes.
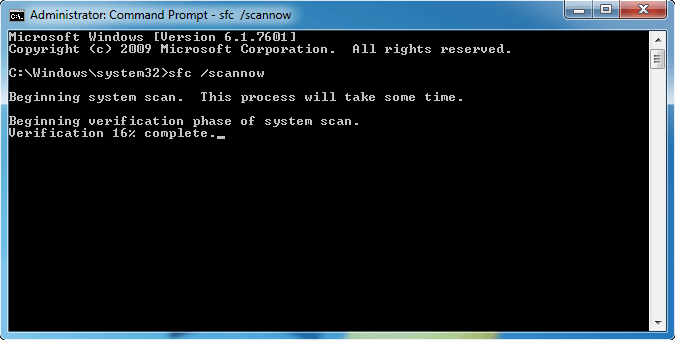
- When the SFC scan is complete, the Command Prompt might state, “Windows Resource Protection found corrupt files and successfully repaired them.” If that’s the case, restart Windows.
How to use SFC scannow in Safe Mode
When you cannot complete the SFC scan normally, you should initiate the same process from Safe Mode.
When the Windows 10 OS runs in Safe Mode all third-party apps, and the processes associated with such software will be stopped or deactivated.
Thus, if the SFC error was somehow related with a third party software, now you will be able to successfully perform the system scan.
Here is how you can reboot your device into Safe Mode right away:
- Launch the Run engine on your Windows 10 device: press the Win+R keyboard keys together.
- In the Run box type msconfig and click on OK.msconfig windows 10
- From System Configuration switch to Boot tab.
- Under Boot options select the Safe mode checkbox and also check Minimal from underneath.
- Click OK and Apply.reboot safe mode windows 10
- When prompted choose Restart.
- Now your device will be automatically restarted into Safe Mode.
- From there run the sfc /scannow command.
Most common System File Checker/SFC scannow errors
Although this process can automatically repair the most common Windows soft-related problems, in some situations, SFC itself might experience malfunctions.
Here are some of the most common issues that users reported:
- Sfc /scannow stuck at verification, at beginning system scan – According to users, SFC scan can get stuck at verification or at the beginning of the scan. However, you might be able to fix the problem simply by replacing the corrupted files.
- Sfc /scannow frozen Windows 10 – This is another issue that can appear with the SFC scan. To fix this issue, it’s advised to restore your PC using System Restore and check if that solves the problem.
- Sfc scannow nothing happens – Couple of users reported that nothing happens while using SFC scan on their PC. If that’s the case, try using the DISM scan instead and check if that solves the issue.
- Sfc scannow stops scanning – According to users, sometimes an SFC scan can stop completely on your PC. Fix the problem by checking out this guide.
- Sfc scannow stops you must be an administrator – SFC scan requires administrative privileges in order to run, and if you’re having any issues with SFC, be sure that you’re using Command Prompt as an administrator
- ****************************
Pengguna windows 10 yang ingin menginstall .NET FRAMEWORK 3.5 mungkin mengalami kesulitan karena harus di install secara online. NET Framework 3.5 biasanya menjadi prerequisites dari beberapa aplikasi dan game. termasuk SQL SERVER 2014 juga membutuhkan Net Framework 3.5.
oke mari kita mulai instalasinya.
1. Bismillah
2. Sediakan tool sxs, bisa di download di link berikut ini :
untuk windows 10 32 bit sxs-win-10-32-bit
untuk windows 10 64 bit sxs-win-10-64-bit
3. Setelah di download dan di extract, silakan copy-paste ke drive C

4. Selanjutnya buka Command Prompt (CMD) (note: klik kanan Run as Administrator)

5. tampilan command prompt seperti dibawah ini

6. Ketikkan perintah dism.exe /online /enable-feature /featurename:NetFX3 /Source:C:\sxs /LimitAccess

7. tekan ENTER
8. Tunggu proses sampai selesai seperti berikut ini :

9. Selamat .Net Framework 3.5 telah sukses terinstall
10. Alhamdulillah
************
Enable or Disable Windows Features Using DISM
- 5 minutes to read


The Deployment Image Servicing and Management (DISM) tool is a command-line tool that is used to modify Windows® images. You can use DISM to enable or disable Windows features directly from the command prompt, or by applying an answer file to the image. You can enable or disable Windows features offline on a WIM or VHD file, or online on a running operating system.
To mount an offline image for servicing
- Open a command prompt with administrator privileges.
- To use DISM from an installation of the Windows Assessment and Deployment Kit (Windows ADK), locate the Windows ADK servicing folder and navigate to this directory. By default, DISM is installed at C:\Program Files (x86)\Windows Kits\10.0\Assessment and Deployment Kit\Deployment Tools\ in Windows 10, C:\Program Files (x86)\Windows Kits\8.1\Assessment and Deployment Kit\Deployment Tools\ in Windows 8.1and C:\Program Files (x86)\Windows Kits\8.0\Assessment and Deployment Kit\Deployment Tools\ in Windows 8.DISM is available in:
- Windows 10
- Windows 8.1
- Windows 8
- Windows Server 2016 Technical Preview
- Windows Server 2012 R2
- Windows Server 2012
- Windows Preinstallation Environment (WinPE) for Windows 10
- WinPE 5.0
- WinPE 4.0
You can install DISM and other deployment and imaging tools, such as Windows System Image Manager (Windows SIM), on another supported operating system from the Windows ADK. For more information, see DISM Supported Platforms. - Use the
/Get-ImageInfooption to retrieve the name or index number for the image that you want to modify. An index or name value is required for most operations that specify an image file.For example, at the command prompt type:Dism /Get-ImageInfo /ImageFile:C:\test\images\install.wim - Mount the offline Windows image. For example, type:
Dism /Mount-Image /ImageFile:C:\test\images\install.wim /Name:"Base Windows Image" /MountDir:C:\test\offline
To find available Windows features in an image
- List all of the features available in the operating system. For example, type:
Dism /online /Get-FeaturesTo service an offline image, specify the location of the mounted image directory. For example, type:Dism /Image:C:\test\offline /Get-FeaturesYou can use>featurelist.txtto redirect the output of the command to a text file that is named featurelist. - Review the list of features to find the feature that you want to enable, disable, remove, or restore.
- Use
/Get-FeatureInfoto list information about the specific feature you are interested in. For example, type:Dism /online /Get-FeatureInfo /FeatureName:TFTP
To enable Windows features
- Enable a specific feature in the image. You can use the
/Allargument to enable all of the parent features in the same command. For example, type:Dism /online /Enable-Feature /FeatureName:TFTP /AllTo service an offline image, specify the location of the mounted image directory. For example, type:Dism /Image:C:\test\offline /Enable-Feature /FeatureName:TFTP /All - Optional: Get the status of the feature you have enabled. For example, type:
Dism /online /Get-FeatureInfo /FeatureName:TFTPIf the status is Enble Pending, you must boot the image in order to enable the feature entirely.
To restore removed Windows features
- Enable a specific feature in the image. If you do not specify a source, DISM will look in the default location specified by group policy for the required files needed to enable the feature For more information, see Configure a Windows Repair Source.If the files are not found in the default location, DISM will contact Windows Update (WU) for the required files. You can use the
/LimitAccessargument to prevent DISM from contacting WU.If you specify multiple/Sourcearguments, the files are gathered from the first location where they are found and the rest of the locations are ignored.For example, type:Dism /Online /Enable-Feature /FeatureName:TFTP /Source:Z:\sources\SxS /Source:C:\test\mount\windows /LimitAccessTo service an offline image, specify the location of the mounted image directory. For example, type:Dism /Image:C:\test\offline /Enable-Feature /FeatureName:TFTP /Source:C:\test\mount\windows - Optional: Get the status of the feature you have enabled. For example, type:
Dism /online /Get-FeatureInfo /FeatureName:TFTPIf the status is EnablePending, you must boot the image in order to enable the feature entirely.
To disable Windows features
- Disable a specific feature in the image. For example, type:
Dism /online /Disable-Feature /FeatureName:TFTPTo service an offline image, specify the location of the mounted image directory. For example, type:Dism /Image:C:\test\offline /Disable-Feature /FeatureName:TFTP - Optional: Use
DISM /GetFeatureInfoto get the status of the feature you have disabled. For example, type:Dism /online /Get-FeatureInfo /FeatureName:TFTPIf the status is DisablePending, you must boot the image in order to disable the feature entirely.
To remove Windows features for on-demand installation
- Remove a specific feature in the image without removing the feature's manifest from the image. This option can only be used when servicing Windows 10, Windows 8.1, Windows 8, Windows Server 2016 Technical Preview, Windows Server 2012 R2, or Windows Server 2012. For more information, see Configure a Windows Repair Source.For example, type:
Dism /online /Disable-Feature /FeatureName:TFTP /RemoveTo service an offline image, specify the location of the mounted image directory. For example, type:Dism /Image:C:\test\offline /Disable-Feature /FeatureName:TFTP /Remove - Optional: Use
DISM /GetFeatureInfoto get the status of the feature you have disabled. For example, type:Dism /online /Get-FeatureInfo /FeatureName:TFTPThe status is Disabled. Beginning with Windows 10, the payload is not removed from Windows client SKUs in order to support push-button reset. The payload is removed from Windows Server SKUs.
To enable or disable Windows features by using DISM and an answer file
- In Windows SIM, open an existing catalog by clicking Select a Windows Image on the File menu and specifying the catalog file type (.clg) in the drop-down list, or create a new catalog by clicking Create Catalog on the Tools menu.
- Expand the catalog in the Windows Image pane, and then expand Packages.
- Expand Foundation, and right-click Microsoft-Windows-Foundation-Package.
- Click Add to Answer File.
- Click Enabled or Disabled next to the features that you intend to enable or disable. Click the arrow to select the opposite choice.You might have to expand an item to see all its children. You must enable the parent if any one of its children are enabled.Note You can't restore or remove a Windows feature for features on demand with an unattended answer file.
- Click Tools on the main menu, and then click Validate Answer File.
- Correct any errors that appear in the Messages pane, and save the answer file.
- At the command prompt, type the following command to apply the unattended answer file to the image.
Dism /online /Apply-Unattend:C:\test\answerfiles\myunattend.xmlTo service an offline image, specify the location of the mounted image directory. For example, type:Dism /Image:C:\test\offline /Apply-Unattend:C:\test\answerfiles\myunattend.xml
To commit changes on an offline image
- Commit the changes and unmount the image. For example, type:
Dism /Unmount-Image /MountDir:C:\test\offline /Commit
Related topics


![image_thumb[4]](https://www.wintips.org/wp-content/uploads/2017/03/image_thumb4.png "image_thumb[4]")


Subscribe to:
Comments (Atom)
IkimFM
 |
 |
|