Is your computer infected with hidden Malware?
ByteFence Anti-malware’s cutting edge software detects and removes Trojans, Worms, Spyware,
Crapware and other high risk malware.
ByteFence is the ultimate protection against crapware and bundleware that sneak in potentially unwanted programs and ads.
Ultimate protection against Malware, Spyware and Crapware, for Free


Get the fix for the
error KERNEL32.dll
not found on Windows
XP, Windows Vista, Windows 7, Windows 8 and Windows 10.
Contents [hide]
About “KERNEL.dll not found”
The following
information on this error has been compiled by NeoSmart Technologies, based
on the information gathered and reported by our global network of engineers,
developers, and technicians or partner organizations.
Description and Symptoms
The error messages,
alerts, warnings, and symptoms below are tied to this error.
Symptom 1: “KERNEL32.dll not found” error screen on startup
The KERNEL32.dll file is
a 32-bit dynamic link library file used in Windows to handle memory
management, input/output operations, interrupts, synchronization, and
process creation. It also exposes most of the Win32 base API’s to
applications, and if this file becomes missing or corrupt, the “KERNEL32.dll
not found” error screen appears.
Here is an example of
“KERNEL32.dll not found” error screen for Windows XP, Vista and Windows 7:

STOP: c0000135 (Unable To Locate Component)
This application has failed to start because KERNEL32.dll was not found. Re-installing the application may fix the problem.
On Windows 8 this error
generates a more generic “Your PC did not start correctly” error screen:

Automatic Repair

Your PC did not start correctly
Press "Restart" to restart your PC, which can sometimes fix the problem. You can also press "Advanced options" to try other options to repair your PC.
While on Windows 10, it
also causes a slightly different error screen to appear:

Your PC ran into a problem and needs to restart. We're just collecting some error info, and then we'll restart for you(45% complete)
If you'd like to know more, you can search online later for this error: 0xc0000135
Causes of this Error
This error has been
known to occur as a result of one of the following causes:
Cause 1: KERNEL32.dll file is corrupt or missing
Virus attacks, power
outages and disk write errors may cause files to become missing or corrupt.
If that’s the case, then the operating system can’t find the KERNEL32.dll
file, and the boot process is halted with a “KERNEL32.dll was not found ”
error.
Fixing “KERNEL32.dll not found” on Windows
Windows Setup
CD/DVD Required!
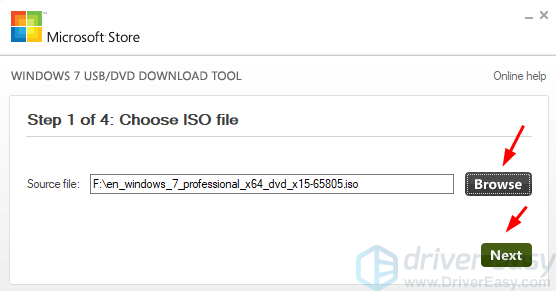
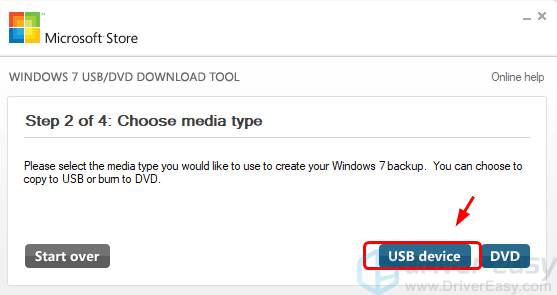
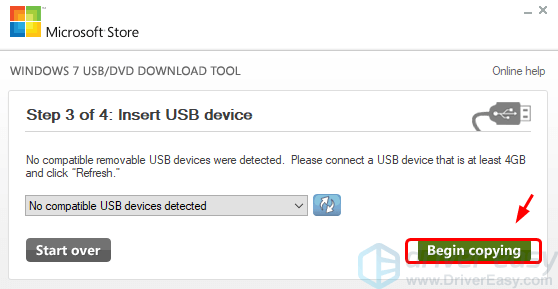
Some of the solutions below require the use of the Microsoft Windows setup CD or DVD. If your PC did not come with a Windows installation disc or if you no longer have your Windows setup media, you can use Easy Recovery Essentials for Windows instead. EasyRE will automatically find and fix many problems, and can also be used to solve this problem with the directions below.
Some of the solutions below require the use of the Microsoft Windows setup CD or DVD. If your PC did not come with a Windows installation disc or if you no longer have your Windows setup media, you can use Easy Recovery Essentials for Windows instead. EasyRE will automatically find and fix many problems, and can also be used to solve this problem with the directions below.
Fix #1: Replace KERNEL32.dll
Windows Setup
CD/DVD Required!
Some of the solutions below require the use of the Microsoft Windows setup CD or DVD. If your PC did not come with a Windows installation disc or if you no longer have your Windows setup media, you can use Easy Recovery Essentials for Windows instead. EasyRE will automatically find and fix many problems, and can also be used to solve this problem with the directions below.
Some of the solutions below require the use of the Microsoft Windows setup CD or DVD. If your PC did not come with a Windows installation disc or if you no longer have your Windows setup media, you can use Easy Recovery Essentials for Windows instead. EasyRE will automatically find and fix many problems, and can also be used to solve this problem with the directions below.
If kernel32.dll is in
fact missing or corrupt, you can restore the original kernel32.dll file back
from your Windows XP installation disc.
Unable to boot
into the Windows setup CD?
See our guide on setting up a PC to boot from the CD or DVD for troubleshooting and more detailed instructions.
See our guide on setting up a PC to boot from the CD or DVD for troubleshooting and more detailed instructions.
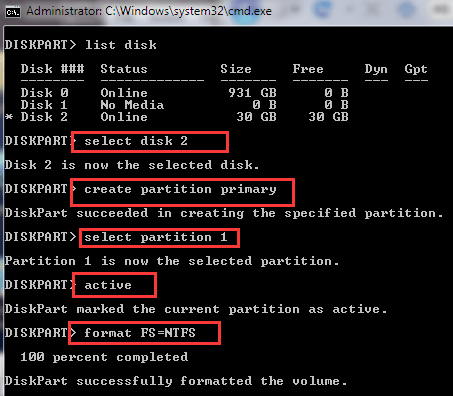
- Insert your XP CD into the computer.
- Restart your computer.
- Press any key to boot into the CD when you see the “Press any key to boot from CD” message.
- Press R to start Recovery Console when the Options screen appears.
- Type in your Administrator password followed by the Enter key to submit it.
-
You’ll reach the Command Prompt now, type the following command, where
D:\is your CD’s drive letter andC:\is the letter of the drive you installed Windows to:expand D:\i386\kernel32.dl_ C:\Windows\system32\
- Press Y when you are asked if you want to overwrite this file and then hit Enter to submit the command.
- Restart your computer.
Here is an example of
what the PC’s console output should look like once the KERNEL32.dll file is
properly restored:

KERNEL32.dll restored from Win XP install CD
Fix #2: Repair corrupted system files with the SFC command
On Windows Vista and
Windows 7, it is possible to use the built-in Windows SFC(system file
checker) tool to automatically scan a computer’s system files and repair
them if necessary.
Here are the steps to
run SFC:
- Boot from your Windows install disc
- Click on Repair your computer after selecting proper language, time and keyboard input.
-
Select the Windows installation drive, which is usually
C:\, and click Next - Choose Command Prompt when the System Recovery Options box appears
-
Write the following command and press Enter afterwards:
sfc /scannow /offbootdir=D:\ /offwindir=D:\Windows\
Replace D: with the letter of the driver where Windows is installed, and D:\Windows with the Windows folder location.
Here is an example of
what the PC’s console output should look like once the sfc.exe scan is
complete and missing files are successfully restored:

KERNEL32.dll restored by the SFC utility
Fix #3: Check the hard drive with CHKDSK utility
If the hard drive has
its file integrity compromised, it is possible to use built-in Windows
CHKDSK utility to scan the disk and fix the file system errors.
Here are the steps to
run CHKDSK:
- Boot from your Windows install disc
- Click on Repair your computer after selecting proper language, time and keyboard input.
-
Select the Windows installation drive, which is usually
C:\, and click Next - Choose Command Prompt when the System Recovery Options box appears
-
Write the following command and press Enter afterwards:
chkdsk C: /f
Replace C: with the letter of the driver where Windows is installed.
Here is an example of
what the PC’s console output should look like once the chkdsk.exe is
complete:

