Thursday, December 26, 2019

Wednesday, December 25, 2019
Delete large folders in Windows super fast
How to delete large folders in Windows super fast
When you delete huge folders in Windows, you will notice that the process takes quite a bit of time to complete.
I keep backup folders of Ghacks locally on a platter-based drive, and these folders come close to 30 Gigabytes in size with more than 140,000 files and 350 folders.
When I need to delete them again, it takes a long time if I run the delete operation in Windows Explorer. First thing that happens is that Windows runs calculations which in itself may take a very long time to complete.
Then when the actual deleting takes place, Windows analyzes the process and posts updates to the file operation window.
It may take ten or twenty minutes, or even longer, to delete a large folder using Explorer on Windows devices.
How to delete large folders in Windows super fast
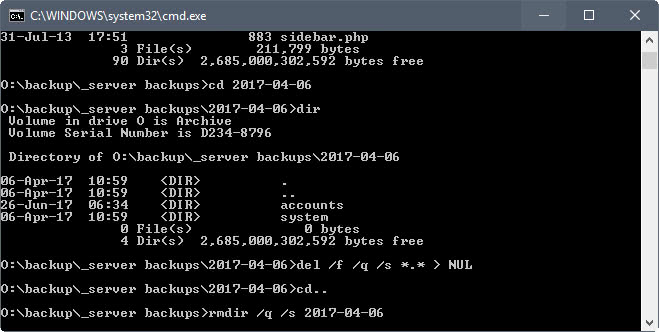
If you run delete commands from the command line instead, you will notice that the operation completes a lot faster. You may notice that the operation needs just a fraction of time that the same operation requires when you run it in Explorer.
Matt Pilz, who wrote about this back in 2015 saw a reduction from 11 minutes to 29 seconds, which made the command line operation more than 20 times faster than the Explorer option.
The downside to this is that it requires use of the command line. Matt suggested to add the commands to the Explorer context menu, so that users could run them in Explorer directly.
The two commands that users require are Del, for deleting files, and Rmdir, for removing directories.
- Tap on the Windows-key, type cmd.exe and select the result to load the command prompt.
- Navigate to the folder that you want to delete (with all its files and subfolders). Use cd path, e.g. cd o:\backups\test\ to do so.
- The command DEL /F/Q/S *.* > NUL deletes all files in that folder structure, and omits the output which improves the process further.
- Use cd.. to navigate to the parent folder afterwards.
- Run the command RMDIR /Q/S foldername to delete the folder and all of its subfolders.
The commands may require some explanation.
DEL /F/Q/S *.* > NUL
- /F -- forces the deletion of read-only files.
- /Q -- enables quiet mode. You are not ask if it is ok to delete files (if you don't use this, you are asked for any file in the folder).
- /S -- runs the command on all files in any folder under the selected structure.
- *.* -- delete all files.
- > NUL -- disables console output. This improves the process further, shaving off about one quarter of the processing time off of the console command.
RMDIR /Q/S foldername
- /Q -- Quiet mode, won't prompt for confirmation to delete folders.
- /S -- Run the operation on all folders of the selected path.
- foldername -- The absolute path or relative folder name, e.g. o:/backup/test1 or test1
Creating a batch file and adding it to the Explorer context menu
If you don't need to run the command often, you may be perfectly fine running the commands directly from the command prompt.
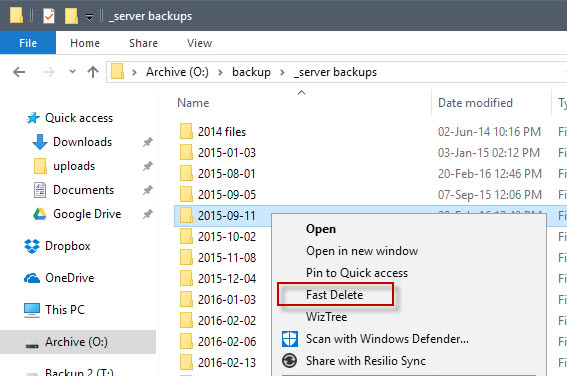
If you do use it frequently however, you may prefer to optimize the process. You may add the command to the Explorer context menu, so that you can run it from there directly.
First thing you need to do is create a batch file. Create a new plain text document on Windows, and paste the following lines of code into it.
@ECHO OFF
ECHO Delete Folder: %CD%?
PAUSE
SET FOLDER=%CD%
CD /
DEL /F/Q/S "%FOLDER%" > NUL
RMDIR /Q/S "%FOLDER%"
EXIT
ECHO Delete Folder: %CD%?
PAUSE
SET FOLDER=%CD%
CD /
DEL /F/Q/S "%FOLDER%" > NUL
RMDIR /Q/S "%FOLDER%"
EXIT
Save the file as delete.bat afterwards. Make sure it has the .bat extension, and not the .txt extension.
The batch file comes with a security prompt. This provides you with options to stop the process, important if you have selected the context menu item by accident. You can use CTRL-C or click on the x of the window to stop the process. If you press any other key, all folders and files will be deleted without any option to stop the process.
You need to add the batch file to a location that is a PATH environmental variable. While you may create your own variable, you may also move it to a folder that is already supported, e.g. C:\Windows.
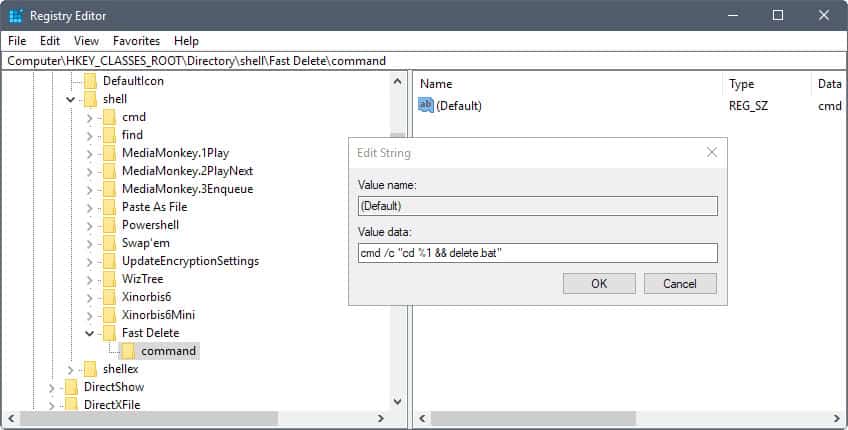
Do the following to add the new batch file to delete folders quickly to the Windows Explorer context menu.
- Tap on the Windows-key, type regedit.exe and tap in the Enter-key to open the Windows Registry Editor.
- Confirm the UAC prompt.
- Go to HKEY_CLASSES_ROOT\Directory\shell\
- Right-click on Shell and select New > Key.
- Name the key Fast Delete
- Right-click on Fast Delete, and select New > Key.
- Name the key command.
- Double-click on default of the command key.
- Add cmd /c "cd %1 && delete.bat" as the value.
Tuesday, December 24, 2019
Sunday, December 22, 2019
How can we paste the code into the HTML of your page, between the head and head tags
https://www.google.com/adsense/new/u/0/pub-5304237173007760/myads/sites
Google AdSense Earnings At Risk Warning - Create Ads.txt File
How can we paste the code into the HTML of your page, between the <head> and </head> tags for connecting your site to Google AdSense?
or first time you are trying to monitise your site google will provide you a code saying paste it to head section so that adscence will spread the spider to your site and monitise your site.
For Blogger:-
Go to blogger then >go to left corner >go to themes>go to edit html >Now paste that code in between head section(Keep in mind this work only when you’re with your p.c)
For WordPress:-
In case if you are using WordPress theme then you can find it in the header.php file which is situated in Appearance > Editor > header.Php file
Saturday, December 21, 2019
Change Your WordPress Database Name in 3 Simple Steps
Change Your WordPress Database Name in 3 Simple Steps
Your WordPress database holds all of your site’s important information, so keeping it safe and organized isn’t something that should be neglected.
Naming your database in a descriptive way can help you more easily keep track of your site and help prevent you from making unintended changes when you can’t tell your databases apart. It also helps protect your site by making it more difficult for hackers to identify and access your database details.
It’s easy to change your database from a default name like db_wordpress123 to db_mysite and it can be done in about five minutes. In this Weekend WordPress Project, I’ll show you how to change the end of your database name to something more recognizable to you, while also being less guessable for hackers.
Edit Your Database
Head over to phpMyAdmin. In cPanel, you can access it through the Databases section of the home page. Once there, select your database from the menu on the left, then click the Operations tab at the top.

Under Rename database to, enter the name you would like to see for your database in the text field and click Go on the bottom, right corner of field. You will be prompted with a pop-up to accept the change.
You will be creating a new database with your chosen name, dropping the tables in your original, then importing those tables to your new database. Click OK to continue with these changes.
Edit Your wp-config.php File
Navigate to your site’s files and in the root of your WordPress install, locate your wp-config.php file. In cPanel, edit the file by selecting it from the list and clicking the Edit button at the top of the page. If a pop-up appears, click Edit again.
You can also choose to download the file through FTP and edit it with a text editor. Either way, include your new database name by finding the piece of code similar to the one below:
https://gist.github.com/jennimckinnon/61816227d6525a28c8a1
Find
define('DB_NAME', 'your_db'); in your file, where your_db is the original name of your database and change it to the new name you chose a moment ago.
Save the file and if you’re using FTP, upload the new file to the root of your install.
Assign a Database User
In cPanel, click on MySQL Databases under the Databases section. Scroll down to the Add a User to a Database area and select your username from the User drop down box.
If you’re not sure what it is, it’s listed in your wp-config.php file on the line with
DB_USER just like in the example above.
Next, select your new database name from the Database drop down box and finally, click the Add button. On the page that loads, select the All Privileges checkbox toward the top, then click the Make Changes button below the table.

Reactivate all your plugins and you’re done!
How to Remove Products in Bulk from Woocommerce
Step 1: Login to phpmyadmin from your Cpanel Hosting
Login to your cPanel hosting or Plesk hosting, Scroll down to database section and click on phpmyadmin.
Step 2: Select the Database
Click on the Respective database and click on SQL tab at top as shown in the below picture.

Step 3: COPY AND PASTE the below code
DELETE relations.*, taxes.*, terms.*
FROM wp_term_relationships AS relations
INNER JOIN wp_term_taxonomy AS taxes
ON relations.term_taxonomy_id=taxes.term_taxonomy_id
INNER JOIN wp_terms AS terms
ON taxes.term_id=terms.term_id
WHERE object_id IN (SELECT ID FROM wp_posts WHERE post_type='product');

DELETE FROM wp_postmeta WHERE post_id IN (SELECT ID FROM wp_posts WHERE post_type = 'product');
DELETE FROM wp_posts WHERE post_type = 'product';
Step 4: Click on Go Button and wait a few minutes.
Once the query is executed properly, All the products are removed. Go and check in WordPress Admin. All the products are removed.
Subscribe to:
Posts (Atom)
IkimFM
 |
 |
|