Job2 Street

Sunday, November 11, 2018

Public DNS Pointing To localhost


http://www.fidian.com/programming/public-dns-pointing-to-localhost

Public DNS Pointing To localhost (127.0.0.1)

posted Oct 7, 2011, 9:01 AM by Tyler Akins [ updated Aug 30, 2012, 6:06 AM ]


When you are developing and using a local development environment, you typically need to hit your own site. A lot. You'd use URLs that look like this:


http://localhost/
http://127.0.0.1/


When you get slightly more advanced, you would want to run multiple sites off your installation. You can easily do this with name based virtual hosts (eg. with VirtualHost directives in Apache's config). Now you want to use urls like this:


http://client1.local/
http://client2.dev/
http://client3/


Those URLs don't work, so now we need to find some way to map our domain names to the "localhost" address.


What if we could map hostnames to 127.0.0.1 and make this work?
Hosts File
The first and easiest method is where one edits their hosts file (/etc/hosts in Linux, C:\Windows\System32\Drivers\etc\hosts for some versions of Windows) and add lines like this:


127.0.0.1 client1.local
127.0.0.1 client2.dev
127.0.0.1 client3


At work, we have up to five different hostnames for each of our clients. Adding yet another client means dozens of developers that now need to edit their hosts file. Oh, the pain and agony when you have to do this for hundreds of domains!


What if we could have a single top-level domain that always resolved to localhost?
DNS Entries - Windows
If you are using Windows DNS, you can create a new zone:


dnscmd /RecordAdd local * 3600 A 127.0.0.1
dnscmd /RecordAdd local @ 3600 A 127.0.0.1
dnsmasq - Linux, MacOS
On Linux systems, you can install dnsmasq to pretend to be a real DNS server and actually respond with 127.0.0.1 for all subdomains of a top level domain. So, if you wanted *.local to always resolve to your own domain, then you can use URLs like this:


http://client1.local/
http://client2.local/
http://client3.local/


You only need to install and set up dnsmasq. There's some well-written instructions at http://drhevans.com/blog/posts/106-wildcard-subdomains-of-localhost that you can follow; I won't repeat them here.


The drawback of this setup is that you now have to install and configure dnsmasq on every machine where you want to use this trick.


What if someone set up DNS entries and basically did this for you?
Available Wildcarded DNS Domains
It turns out that some kind hearted people already set up wildcarded domains for you already. You can use any top level domain below and any subdomain of these and they will always resolve back to 127.0.0.1 (your local machine). Here's the list of ones I know about. Let me know if there are more!


fuf.me - Managed by me; it will always point to localhost for IPv4 and IPv6
localtest.me - Also has an SSL cert - see http://readme.localtest.me
ulh.us
127-0-0-1.org.uk
ratchetlocal.com
smackaho.st
42foo.com
vcap.me
beweb.com
yoogle.com
ortkut.com
feacebook.com
lvh.me
Now, with these wildcarded domains, you don't need to do any modification of your system for requests to come back to your own server. For instance, you can go to http://client1.127-0-0-1.co.uk/ and the web page request will always head back to your own server. You'll still need to configure your web server to answer on this hostname, but at least the DNS portion of the problem is now solved.

Tuesday, October 23, 2018

Using Agricultural Drone Farmer Is Able To Lower Agriculture's Cost


WordPress Theme Editor
Di dalam konteks teknologi drone merupakan pesawat tanpa pemandu. Drone adalah lebih rasmi dikenali sebagai unmanned aerial vehicles (UAV) ataupun kenderaan udara tanpa pemandu. Pada asasnya, drone adalah robot terbang. Pesawat itu dikawal dari jarak jauh atau boleh terbang secara autonomi melalui software-controlled flight plans didalam embedded sistem yang bekerja bersama-sama dengan GPS. UAV sering dikaitkan dengan tentera, tetapi mereka juga menggunakan drone untuk mencari dan menyelamat, pengawasan, pemantauan trafik, pemantauan cuaca dan memadam kebakaran.

Pada April 2017, Lembaga Kemajuan Pertanian Muda (MADA) mengambil inisiatif memperkenalkan penggunaan pesawat drone untuk menyembur racun dan memantau keadaan tanaman di sawah. Kaedah ini adalah bagi menggantikan aktiviti meracun secara manual di sawah padi.

Sesiapa yg nak menjadi petani moden yg akan mengurangkan kos dan tenaga atau pun nak mengambil upah (servis) untuk para petani, NAH.... Di sini ada berbagai jenis drone untuk kegunaan petani dan pertanian.

Dari harga serendah RM5,000.00 hingga ke RM20,000.00 ++ anda mampu menjadi petani berjaya atau perniagaan servis yang berjaya.


Monday, October 15, 2018

Selected Items

Saturday, October 13, 2018

What Is ePacket Delivery


What Is ePacket Delivery?

ePacket delivery is an agreement between the US Postal Service (USPS) and Hongkong Post. The goal is to increase international ecommerce sales for China. It allows for faster ePacket delivery of products coming from China and Hong Kong to a number of different countries. Merchants can send small packages weighing up to 2 kg (4.4 lbs).
The value of the package also needs to be less than $400.

What are the Benefits of Using ePacket?

As the name “ePacket” suggests, the shipping service was formed for ecommerce purposes, in order to make it faster and more affordable for customers to receive their purchases from online stores and marketplaces that shipped from China and Hong Kong.
ePacket became so successful within the US that they began expanding internationally. The list of countries that have access to ePacket is constantly growing.
Prior to the introduction of ePacket, the China EMS was the alternative that was relied on for affordable delivery of customer products. The downside of this however was that it would often take more than a month for the customers to receive their orders. Any other alternative option available was far too expensive, especially considering the price of the product.
Alongside cost and time efficiency, ePacket offers a variety of other benefits to buyers, including:
  • Door-to-door China ePacket tracking: The ePacket delivery provides customers the option of end-to-end tracking, without paying any additional costs. This is a huge benefit for them to be able to monitor the location of the package. The ePacket can easily be tracked on official websites such as EMS and USPS.
  • Free returns on any undeliverable items: Another benefit to the customers is the sense of security they get knowing that any undeliverable item is returned, without any additional expense. This in turn, improves the customer-merchant relationship, as the online merchants will be able to provide refunds on any packages that were not successfully delivered to customers.
  • Payment of postal customs: Any customs, duties, and/or taxes must be paid by the recipient of the shipment. As the ePacket delivery goes through regular custom clearance, customers might be required to pay any applicable taxes and duties. 
Keep in mind that it’s not possible to offer free shipping on all products. If the package is under 24″ x 36″ and less than 2kg, it qualifies for ePacket shipping. Notably, this type of ePacket delivery method must be shipped from either China or Hong Kong. Thus, if certain dropshipping vendors have products shipping within the US, customers cannot benefit from ePacket shipping in that specific case.

Which countries have ePacket shipping?

There is a growing list of countries that are able to benefit from the affordable China Post’s ePacket service. Updated: December 2017.
  1. Australia
  2. Austria
  3. Belgium
  4. Canada
  5. Denmark
  6. Finland
  7. France*
  8. Germany
  9. Greece
  10. Hong Kong
  11. Hungary
  12. Ireland
  13. Israel
  14. Italy
  15. Japan
  16. Korea
  17. Luxembourg
  18. Malaysia
  19. Mexico
  20. Netherlands
  21. New Zealand
  22. Norway
  23. Poland
  24. Portugal
  25. Russia
  26. Saudi Arabia
  27. Singapore
  28. Spain
  29. Sweden
  30. Switzerland
  31. Thailand
  32. Turkey
  33. Ukraine
  34. United Kingdom**
  35. United States***
  36. Vietnam (currently in a trial run)
* France: Packages can be shipped to mainland France with zip codes that start with 01 to 95. The packages cannot currently be shipped to overseas territories, including Corsica, Guadeloupe, Martinique, French Guiana, Reunion, St. Pierre and Miquelon and Mayotte.
** United Kingdom: Packages can be shipped to mainland UK as well as the Channel Islands and the Isle of Man.
*** United States: Packages can be shipped to all states, territories and military addresses within the United States.

Average ePacket Shipping Times

Mexico: 20 business days
Vietnam: 5-7 business days
Russia, Ukraine and Saudi Arabia: 7-15 business days
All other supported countries: 7-10 business days

Weight Limit

Israel: 3 kg
All other supported countries: 2 kg

ePacket Tracking – How to Track ePacket Delivery from China

One of the greatest perks of using China post’s ePacket shipping service is the ePacket tracking facility. It may be a bit tricky to keep track of all your parcels, especially when shipping a large amount at once. Customs, foreign postal services, and other barriers might hinder the tracking of any single item, let alone a large number. The tracking information can be very valuable to the customers so that they can know the location of their delivery. This also helps prevent any customer concerns regarding scams, if say, their package is not delivered within the given time frame.
It is important to learn how to track the ePacket. ePacket shipping also features ePacket tracking and delivery confirmation in the US Postal Service network.
The ePacket tracking codes must be obtained through your supplier. You can track ePacket shipments by using USPS , ePacket China Post, or sites like 17track.net. All Oberlo Suppliers and Oberlo Verified Suppliers offer ePacket delivery, so you’ll be able to get your products to your customers promptly. Oberlo Verified Suppliers also have an excellent track record of shipping 95% of all orders on time, so they’ll be on the road to your customers quicker. 
You can find a tracking code by going to Oberlo > My Orders, and you’ll see the tracking code next to all of your fulfilled orders.

https://www.oberlo.com/blog/what-is-epacket-delivery

Friday, October 12, 2018

Buy This Item

Sell on Multiple Marketplaces


Published on 13 May 2018

SUBSCRIBED 219
Sell on Multiple Marketplaces (Lazada, Shopee, 11street, Lelong.my) effortlessly with SiteGiant Marketplace Sync, your income has no limit now! " Before that without Marketplace sync, we hit a bottleneck in our business. Sales have been stagnant for quite some time. But now I'm able to save at least 80% of product uploading in marketplaces. More time on business opportunities and marketing." Ms Yong Baby & Kids Product Online Wholesaler How SiteGiant benefit eCommerce merchants : ✅ List and Manage products across all participating marketplaces (Lazada, Shopee, 11street, Lelong) in one simple integrated platform ✅ No more messy inventory, inventory details automatically updated in participating marketplaces ✅ Orders fulfilled in a shorter time, and less manpower as well ✅ Implement different pricing strategies with a few clicks, increase sales in all markeplaces ✅ Analytical tools to further understand and improve your business More information 👉 http://www.sitegiant.my/marketplace-s... FREE Consultation ☎️ Call/Whatsapp: +6012-7190122 Email us ✉️ sales@sitegiant.my


Monday, October 8, 2018

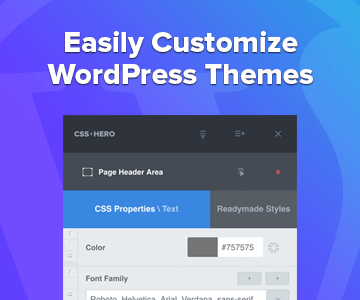
CSS Hero Discount Code

I'll be doing a few more videos on CSS Hero soon. These will include another one showing all the options you can change in the Beaver Builder theme. I also plan on doing one for the Genesis framework. Last, but not least, I'll be recording one on how to style Contact Form 7 forms and Gravity Form with CSS Hero. That one will be really cool!

Win a copy of CSS Hero

I have one license of CSS Hero to give away. The first person to leave a comment on this post will get a free copy of CSS Hero from me:)
Thanks for stopping by. I hope you found this post and video useful.
Until next time,
Colin
EDIT
As you can see in the comment section, David was the winner of the free copy of CSS Hero. I hope you're having fun with it David:)

CSS Hero Discount Code

For those of you who weren't lucky enough to win the free copy of CSS Hero, I have some good news for you. The CSS Hero team have given me a Discount Code that you can use to buy CSS Hero at a lower price.
Just click on one of the following links and enter HEROBEAVER in Coupon box to get the discounted price:
 
More videos and cool tips on how to use CSS Hero soon.

cutomize wordpress with elementor or csshero

Using Elemento
Using Css Hero


https://www.csshero.org/themes/

wordpress customize header and wonderplugin

site-header {
height: 150px ;
}
/** .site-header {
display: none
}
*/
.main-navigation {
display: none;
}


You’ll need to inspect the source on the pages you’re trying to do this on and identify the unique class in the body tag.
You’ll then need to prefix the following CSS with the page’s unique body class.
.main-navigation {
  display: none;
}
So for example, to hide your menu on your home page only, you’d say:
.home .main-navigation {
  display: none;
}
All CSS to be placed under Appearance > Custom CSS.
To hide the menu on this page here: http://demo.siteorigin.com/vantage/plugin-intergration/ you’d say:
.page-id-2 .main-navigation {
  display: none;
}

How to create a WordPress page without header, menu, sidebar and footer?

In this tutorial, we will guide you how to create a WordPress page with no header, menu, sidebar and footer etc. The only content will be what you have entered in the page editor.

Step 1 - Create a WordPress page template file

In your local computer, create a text file, copy the following code and save it as "page-cleanpage.php".
<?php
/**
 * Template Name: Clean Page
 * This template will only display the content you entered in the page editor
 */
?>

<html <?php language_attributes(); ?> class="no-js">
<head>
 <meta charset="<?php bloginfo( 'charset' ); ?>">
 <meta name="viewport" content="width=device-width, initial-scale=1">
 <?php wp_head(); ?>
</head>
<body>
<?php
 while ( have_posts() ) : the_post(); 
  the_content();
 endwhile;
?>
<?php wp_footer(); ?>
</body>
</html>

Step 2- Upload the file to your WordPress theme folder

FTP the created file page-cleanpage.php to your WordPress theme folder, which is wp-content -> themes -> yourthemename.

Step 3 - Select the template in the WordPress page editor

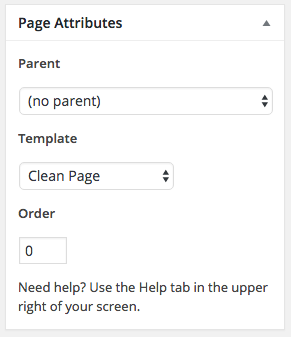
In the WordPress page editor, Page Attributes tab, choose Clean Page from the Template drop-down list.
WordPress page without header, menu, sidebar and footer
Demo pages are as follows:
For how to create a WordPress fullscreen slideshow, please view the tutorial: https://www.wonderplugin.com/wordpress-slider/how-to-create-a-fullscreen-wordpress-slideshow/
PLUGINVERSIONRELEASE DATEDOWNLOAD
WonderPlugin 3D Carousel2.3September 26, 2018
WonderPlugin Audio Player7.3September 22, 2018
WonderPlugin Carousel14.2September 18, 2018
WonderPlugin Gallery11.4August 6, 2018
WonderPlugin Lightbox6.9September 14, 2018
WonderPlugin Popup5.4September 14, 2018
WonderPlugin Portfolio Grid Gallery13.6August 31, 2018
WonderPlugin Slider10.4May 17, 2018
WonderPlugin Tabs5.8August 1, 2018

Install the Plugins

There are two methods to install the downloaded plugin ZIP file in your WordPress.
You could directly upload the plugin ZIP file in your WordPress backend or you could extract the ZIP file on your local computer first, then FTP the plugin folder to your FTP web server. Please view the following tutorials:

K-Play

kPlaylist - get your music online

The player will show in this paragraph

2 3

IkimFM

speaker music speaker